Recently I bought a new laptop which came pre installed with Windows 11. I decided to wipe the laptop and reinstall a fresh copy of Windows 11 for the following reasons:
- I don’t know what happened with the laptop in between the manufacturing of the components and the assembled product arriving at my doorstep.
- I could see there was 30 GB of diskspace used up by a folder called drivers which probably was not needed.
- The laptop was not setup using all security features available in the hardware and software
Below you can find the steps I took to wipe, install and finally secure my laptop with Windows 11 Pro Edition.
Step 1: Setting up the BIOS
- Secure the BIOS with a password. This prevents others from disabling or changing the hardware based security that comes with your new computer.
- Enable all hardware security settings such as secure booth and Intel Platform Trust Technology. This was a bit of a surprise to me, but not everything was enabled when I got the computer.
- Enable boot from USB.
- Modify boot order to prioritize boot from external device or USB above booting from HDD.
Step 2: Creating installation media
This step needs to be executed on a computer you trust. Which is not your new computer. You’ll need a USB 3.0 compatible device, I tried it with a USB 2.0 USB stick but the laptop won’t boot from it. I chose a small USB stick. 32 GB is sufficient. Ensure it is formatted in FAT32.
Use your old (trusted) computer and follow the steps on the Microsoft site: Download Windows 11 (microsoft.com) Choose option two: Create Windows 11 Installation Media. This post will be assuming you used a USB stick for this from now on.
Download all necessary drivers from your computer manufacturer’s website. Most importantly: LAN and or WiFi drivers. Copy these drivers to the USB stick. Without the network drivers you may not be able to connect to the internet and thus finish your installation. There are ways around that1, but I won’t be covering that.
Step 3: Zero fill your harddrive
The prerequisite to this step is to ensure bitlocker encryption is turned of on the new machine. Otherwise the Windows boot media won’t allow you to destroy the old partitions.
- Put the USB stick into your new machine and boot up.
- Choose new installation and custom
- Delete all partitions
- Create one new NTFS partition. The setup will automatically create the needed additional partitions.
- Go into cmd and use the following command to zero fill the drive:
format [drive letter]: /fs:NTFS /p:1- Documentation: format | Microsoft Learn
Step 4: Install windows
Continue the installation. At some point you’ll need to install the drivers, you can use SHIFT+FN+F10 or SHIFT+F10. This will open the command prompt. In my case I could not type in there right away. Hitting the alt+tab a few times to switch between windows did the trick.
The installation process asks for a Microsoft account. There is some debate as to the security of that. I choose to setup the machine with one. It can serve as backup should I ever loose my local password. I advice to secure those Microsoft accounts with a token.
A good thing to know about Microsoft accounts is they can install anything through the app store. So I would not setup Microsoft accounts for others to use on the machine.
The setup asks for some permissions, I deny everything.
Finally install all updates. Make sure that after pressing ‘Check for updates’ in Windows update the message you get is ‘You’re up to date’. Oftentimes after the first time checking for updates there will be more updates if you press the ‘Check for updates’ another time. Just keep hitting that button until the machine is really up to date.
Step 5: Apply Microsoft Windows 11 Security Baseline
Microsoft has provided Powershell scripts for each major Windows release that help you setup some basic security on your machine:
I recommend running these scripts from Powershell ISE so that you can see any errors if it does not run as expected.
- Download:
- You’ll need to download the one for your specific Windows version. For instance: ‘Windows 11 v23H2 Security Baseline.zip’.
- LGPO.zip
- Extract both zips
- Copy the LGPO.exe into the ‘Windows 11 v23H2 Security Baseline\Scripts\Toolsfolder’
- Open Powershell as administrator
- Navigate to the script
- Windows 11 v23H2 Security Baseline\Scripts\Baseline-LocalInstall.ps1
- Run it with the
-Win11NonDomainJoinedflag
- Take note of any errors
- You may run into execution policy error
- LGPO file not found error
- Once finished there should be a log file that shows the successful execution of the scripts.
- This script will ensure your drives are encrypted. Wait for that process to finish
- Reboot
Step 6: Confirm device guard is setup as expected
This step assumes your machine is compatible with all the device guard features. If this is not the case setting up your machine like this will make it crash in case of incompatible drivers or other requirement mismatches.
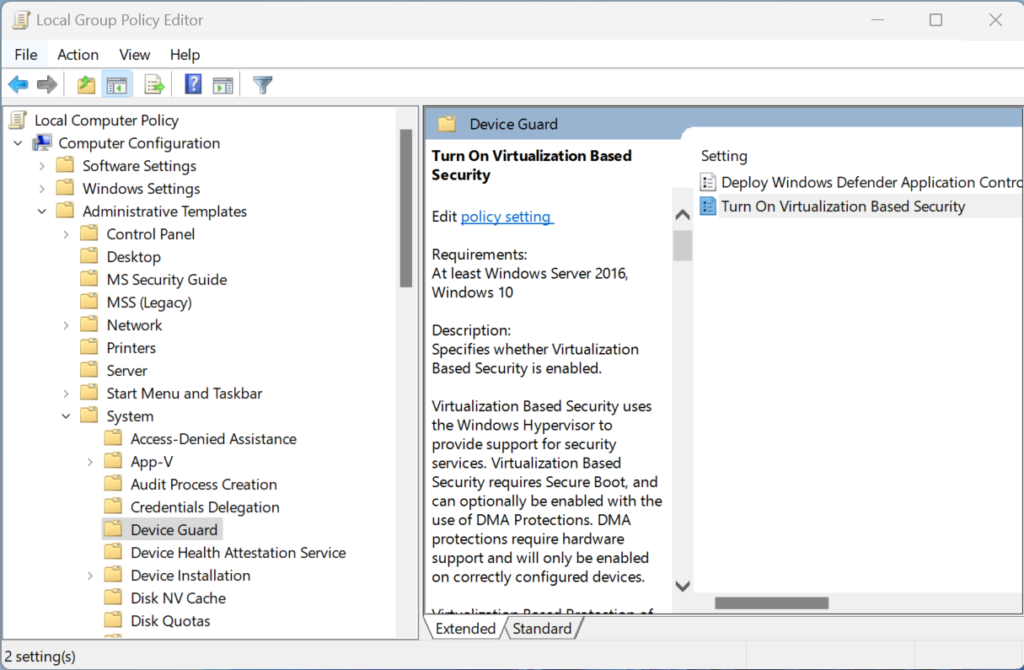
Windows 11 contains a number of features that protect your machine. The security baseline from step 5 sets up a few of them. One thing to check is the device guard settings. Open the start menu and look for ‘Edit Group Policy’.
Once opened find the settings for device guard: Computer Configuration>>Administrative Templates>>System>>Device Guard

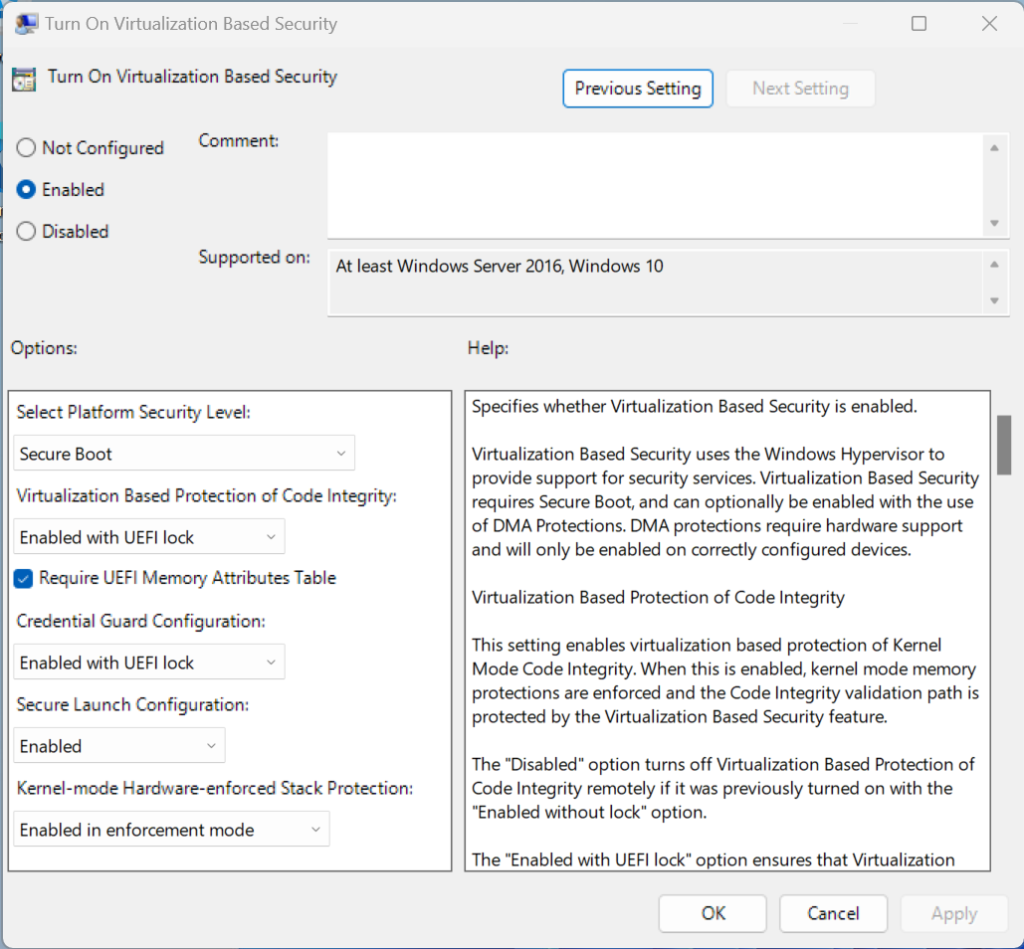
Open the ‘Turn on Virtualization Based Security’ and set it up to make use of all features.

Reboot your machine.
Step 7: Force control+alt+del for login
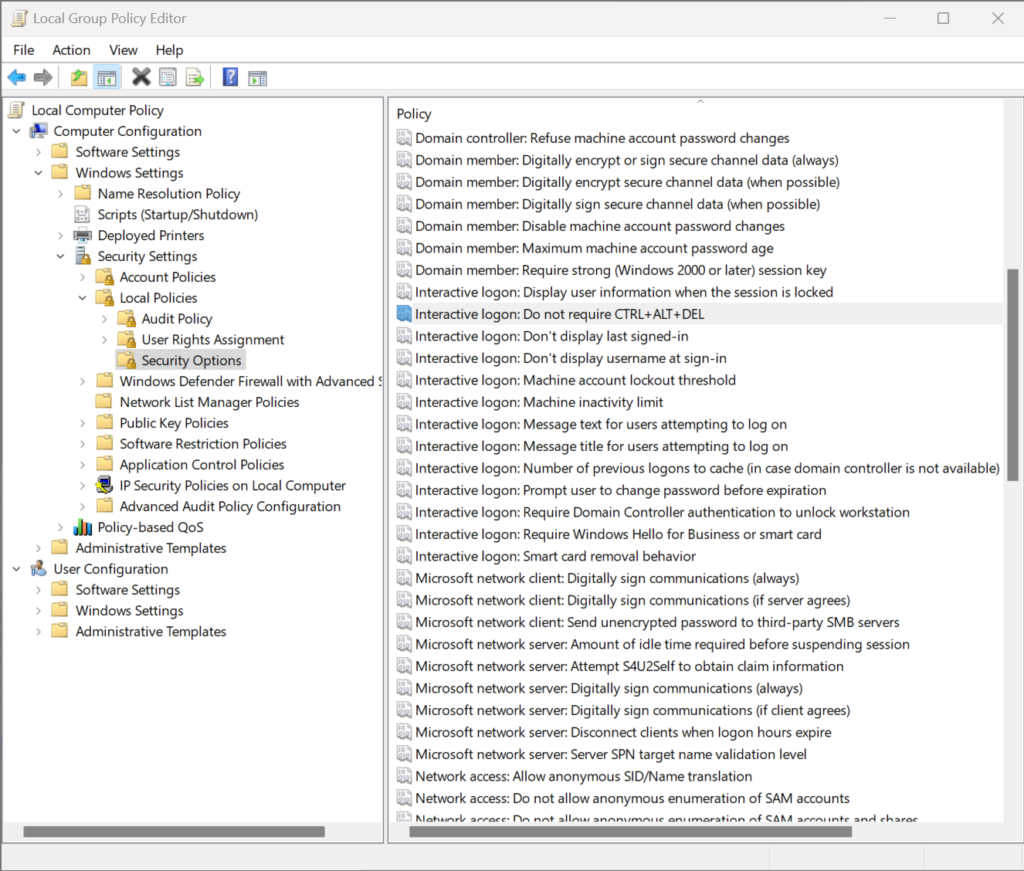
Setup your machine to require the CTRL+ALT+DEL key combination before entering login details. Open the start menu and look for ‘Edit Group Policy’.
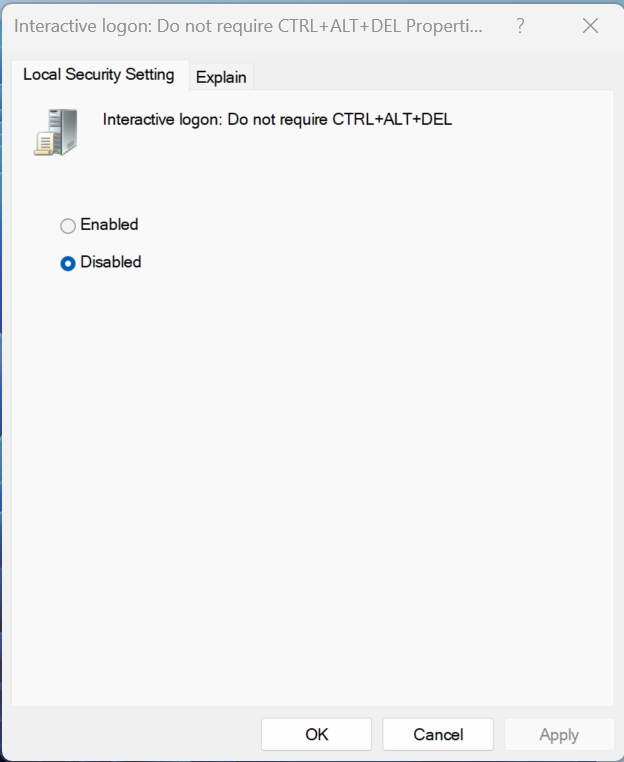
Once opened find the settings for ‘Interactive Login: Do not require CTRL+ALT+DEL‘: Computer Configuration>>Windows Settings>>Security Settings>>Local Policies>>Security Options>>Interactive Login: Do not require CTRL+ALT+DEL
Set the policy to ‘Disabled’


Step 8: Run edge in a container
It’s possible to browse inside a container which protects your system from some browser based attacks. This feature is documented here: Microsoft Defender Application Guard – Windows Security | Microsoft Learn
To install and use you can find two excellent links here:
- Install or Uninstall Microsoft Defender Application Guard for Microsoft Edge in Windows 11 Tutorial | Windows 11 Forum (elevenforum.com)
- Open New Application Guard Window in Microsoft Edge Tutorial | Windows 11 Forum (elevenforum.com)
Step 9: Disable boot from USB
Once finished with the setup, make sure to disable boot from USB in the BIOS. This will prevent someone being able to run a USB Bootable media on your machine potentially circumventing all precautions you took to secure your data.
Notes
- Windows 11 setup without Microsoft account: How to Install Windows 11 Without a Microsoft Account | Tom’s Hardware (tomshardware.com) ↩︎